ELECTROMAGNET BUILD INSTRUCTIONS
Review ALL instructions before building
4 SECTIONS
> SAFETY
> PARTS
> BUILD
> TEST
A note about starting and completing a project.
Any project can be completed with these 3 T’s:
- TOOLS (Use right tool for the project)
- TECHNIQUE (Use best technique for the project)
- TENACITY (Be determined to complete project)
Every project will have its own mix of the 3 T’s. You may have an easy project that requires a special tool. Or, you may use your hands as tools, but there’s a lot to do and you’ll need some tenacity to finish.
IMPORTANT SAFETY TIP:
Always wear safety glasses when building your electromagnet and when working on any electric project.
You only have two eyes, always protect them from danger!
IN CASE YOU MISSED THE STEM INFO PAGE:
1. Safety first
Learn to work safely when building your electromagnet and other electrical projects.
2. Parts required
Learn the parts you will need to build and test your electromagnet and where to find them.
3. building It
Learn to build an electromagnet from a UCLA Electrical Engineering graduate & STEM educator.
4. Testing It
Learn how to test your electromagnet and learn why testing your completed projects is a big deal.
1. safety
Always think safety first when working on any project.
Always wear eye protection when building your electromagnet; you never know when an accident may happen. For example, when twisting your magnet wire around the iron core, you don’t want the loose end of it coming around and hitting you in the eye. Ouch!
Be aware, this is not a toy you’re building. It uses a battery, and a battery contains “electrical energy” that can be dangerous.
NOTE: Never connect the magnet wires (or other wire) permanently to the battery terminals. This is dangerous.
Use caution when testing your electromagnet. Use your finger tips to hold the ends of the magnet wire to the battery terminals briefly for testing. When you use a fresh new battery, you will probable feel the heat being generated at your fingertips within a few seconds. Let go of the battery and let the magnet wire ends fall away from the battery terminals.
This information will be repeated in the ‘Testing It’ section.
Please press play below for a little more information on safety.
2. parts
* You will only need ONE (1) part from each of the four (4) Items listed below.
2. One WIRE
3. One IRON CORE
4. One TEST PART
Ask yourself, where can you find some of these parts? Think creatively and use your imagination to solve this challenge.
You can ask a parent, guardian, or teacher for the parts you will need to build your electromagnet. Be thankful.
Visit an electronics store and kindly ask, “Any chance you have donation parts for a worthy cause?”. Ask nicely.
Electricians have these parts and would probably like to donate to help with your “electric” educational project.
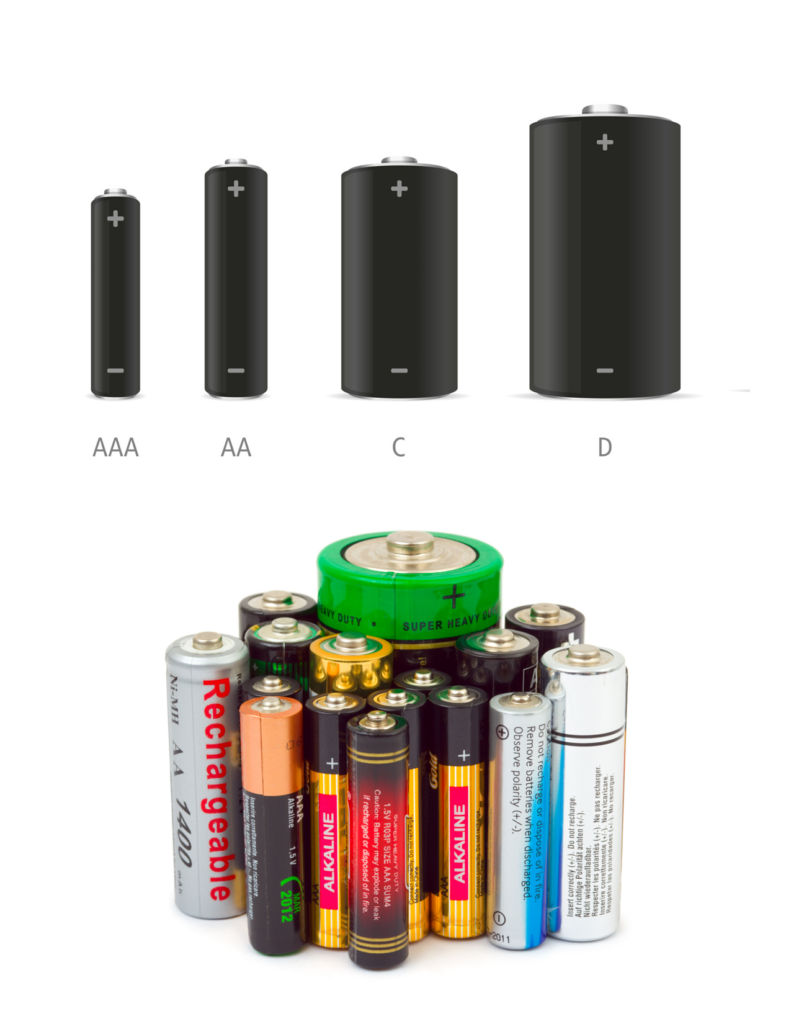
1. Battery
You will need a battery, as this is the power source (‘ELECTRIC CHARGE’) for the electromagnet.
Any AAA, AA, C or D battery will work. Use a new battery for best results. However, be careful!
CAUTION: WHEN USING A NEW BATTERY, YOUR FINGER TIPS WILL FEEL A LOT OF HEAT WHERE YOU PINCH THE WIRE TO BATTERY TERMINALS.
THEREFORE, BE PREPARED TO ONLY HOLD THE WIRE ENDS TO THE BATTERY TERMINALS BRIEFLY AT FIRST.
These batteries are rated at 1.5 Volts (1.5V) and have a positive (+) and a negative (-) side, or terminal.
To “turn on” your electromagnet, the battery must make contact with the wire, making a “closed circuit”. Details about this follow below in step 4, How To Test.
As a good reminder, here are two important nature phenomena (physics) about ‘ELECTRIC CHARGE’:
Remember, ‘ELECTRIC CHARGE’ moving in a wire creates a ‘MAGNETIC FIELD’ around the wire.
And, it works the other way around, meaning…
A ‘MAGNETIC FIELD’ moving near a wire creates a flow of ‘ELECTRIC CHARGE’ in the wire.
Another name for this flowing ‘ELECTRIC CHARGE’ is called ‘ELECTRICITY’.
2. WIRE (CONDUCTOR)
Both Connecting Wire and Magnet Wire are good choices.
A metal wire is a type of “CONDUCTOR”, and can be made from metals like Copper or Aluminum. See photo of colorful wires.
You will need a length of insulated wire to “conduct” electricity.
Connecting Wire may be made of either one solid wire or of many wires we call stranded. The colorful wires in the picture are stranded.
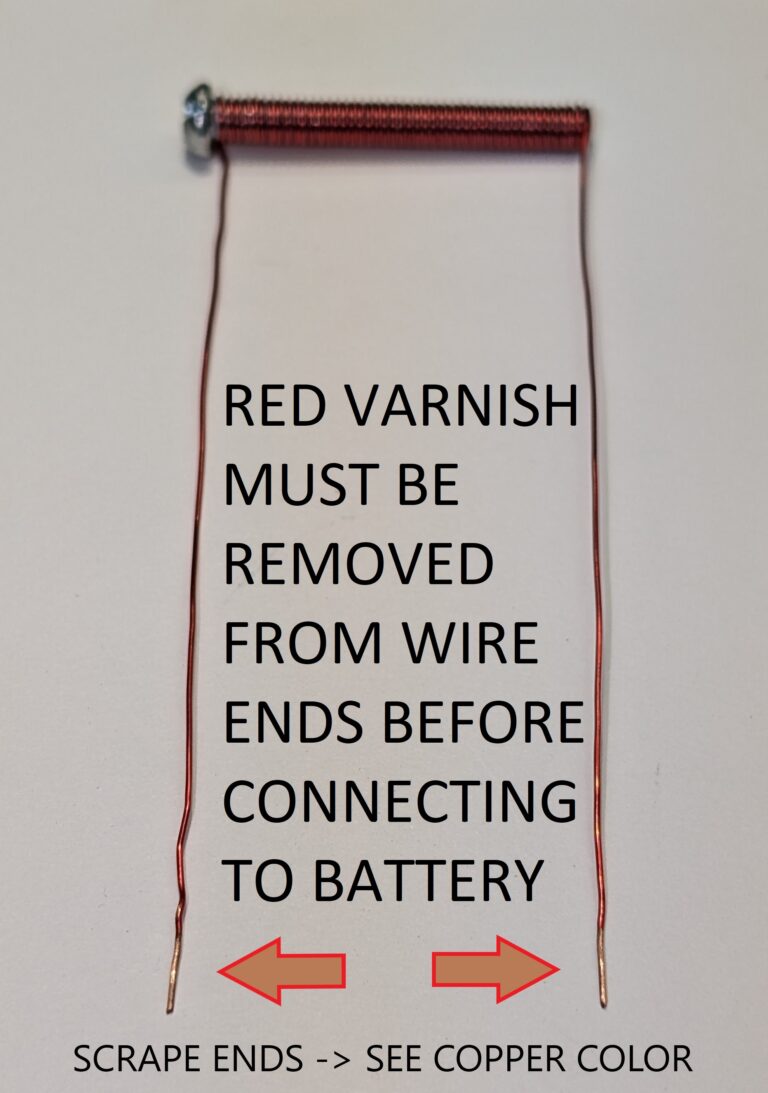
Magnet Wire is solid, as shown in the picture (size: 24 MAG). It has an insulative reddish varnish that must be removed from the ends, to expose the copper underneath, prior to testing.
Two items to consider: WIRE SIZE and WIRE LENGTH.
The WIRE SIZE should be in the range of 18 to 24 American Wire Gauge (AWG). As the number gets smaller, the wire gets thicker (18 wire is “thicker” than 24 wire).
The WIRE LENGTH should be between 1 to 3 feet long, at minimum; it’s ok to use a little more. Actually, it will make your electromagnet even stronger.
Generally, your electromagnet will be stronger if you use more wrappings and a thicker wire.
In summary, you can make your electromagnet with either “connect wire” or “magnet wire”. Both of these are types of “conductor wire”.
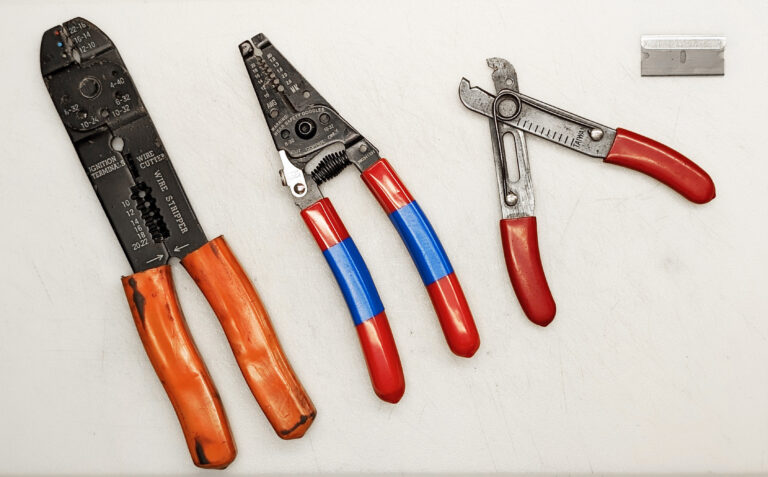
Here are pictures of different types of wire strippers. Many have specific sized holes for stripping the wire of the insulation. These can strip wire in the range of wire sized 10 up to 22, AWG.

3. Iron Core
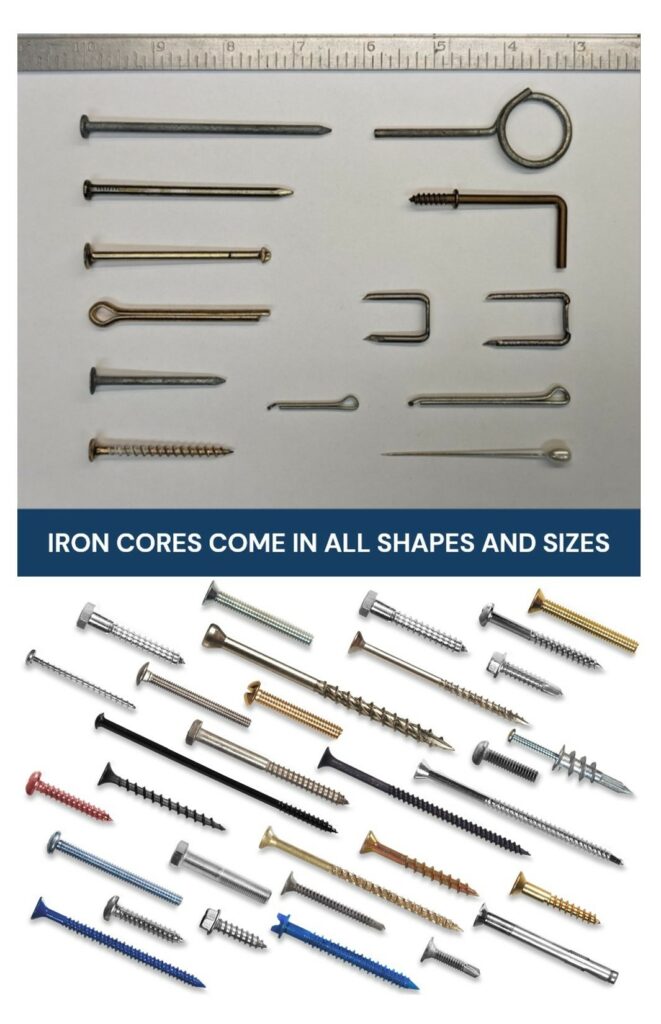
The IRON CORE is the metal part you will wrap your conducting wire around to create your electromagnet.
Wrapping your conducting wire around an IRON CORE increases the strength of the electromagnet.
As shown in the pictures, various types of items can be used as your IRON CORE.
Strictly speaking, your IRON CORE needs to be made of a material that can be magnetized.
Materials that can be magnetized, which are also the ones that are strongly attracted to a magnet, are called ferromagnetic.
The specific IRON CORE we use for our in-person build workshops is a “Machine Screw, Round Head Combo, #8-32 x 1-1/2 inch, made by Everbilt.”
A benefit of using a machine screw with magnet wire (24 AWG), is that the wire stays in place and will not slip off the screw, because the wire “sits” in the threads.
For other electric projects, such as the “electric telegraph”, a common 3 inch construction nail is ideal, as they are both cheap and readily available.
In the telegraph project, the wire stays in place because the top of the nail holds it at the top, and the bottom of the nail is inserted into a foam chassis, thus keeping the wire from coming off the nail and unwinding.
You can experiment with various IRON CORES to see if using one or another makes a noticeable difference.
More wire wraps around the ‘IRON CORE’ = a stronger ‘MAGNETIC FIELD’!
4. Test Parts
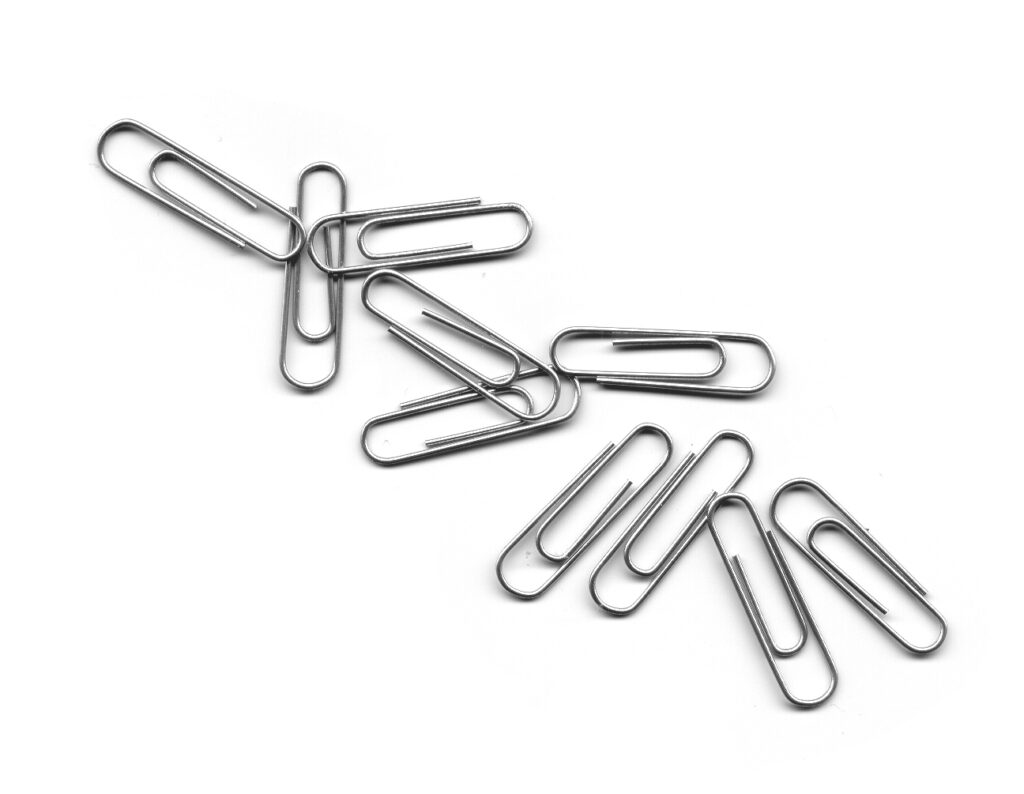
You will need at minimum a small metal piece to test your electromagnet.
Paperclips may be one of the most readily available test parts.
However, with a little effort, you can find different items that can work in place of a paperclip.
You can use small washers or nuts.
Look around and find small metal parts that can be magnetized.
We call these parts we use for testing, the “Test Parts”.
3. build
Below are build instructions for both the parts we provide students during our in-person workshops and general build instructions that work when using similar parts.
1. Measure out and cut off a length of Conducting Wire.
Length can vary depending on the Wire and Iron Core type.
Remember, you may use either Magnet Wire or Connect Wire as your conducting wire to build your electromagnet.
You should try to acquire at least 3 feet of wire to work with, but a foot of wire will also work. You can experiment with length.
If you missed it above, under Electra’s video is information on how to find the parts you need for this project.
In this project and our Electromagnet Project Kit, we us 2 feet 8 inches (32 inches) of Magnet Wire (24 AWG).
We use this wire length with a 1.5 inch Machine Screw as our Iron Core. After wrapping the screw completely, about 5 inches of “free” wire remains on each side, for freedom of movement, to connect to a battery.
Finally, you’ll learn to prepare and put a “pigtail” on each wire end, for making contact with a battery.
2. Wrapping the conducting wire around the Iron Core.
In this example, we use these items:
Magnet Wire (24 AWG), 2 feet 8 inches (32 inches) long.
Machine Screw, Round Head Combo, #8-32 x 1-1/2 inch, by Everbilt; our Iron Core.
We Start by leaving 5 inches of the conducting wire “free”; this is the wire length that will NOT be wrapped around the Iron Core. You will also have about 5 inches “free” on the other end, after the screw is wrapped completely.
These two ends, will have their ends prepared later, and be used for connecting to the battery terminals.
Begin wrapping near the top of the screw head (at 5 inches), and wrap wire carefully, you are going to wrap the wire around, and into, the screw threads or grooves. Think of these threads like grooves that spiral around the screw.
To place the wire inside a thread or groove of the screw, carefully focus on the placement of the wire on the screw. You want to go around carefully, placing more wire on the screw, by following the screw threads…and again, wrap the wire around the screw again, following the path of the screw thread, until you reach the end of the screw.
As you wrap the wire around the screw, keep the wraps of wire next to each other. See picture below.
You want to have the screw completely wrapped around the iron core, from one end to the other end.
Note: They do not need to be “perfectly wrapped” for your electromagnet to work.
After wrapping, you should also have 5 inches remaining “free” on the other end.
A benefit of using a machine screw with magnet wire (24 AWG), is that the wire stays in place and does not slip off the screw, because it “sits” in the threads, or grooves.
If you use a common 3 inch construction nail, on average, you’ll get about 15 wraps per inch.
When you are finished wrapping your Iron Core with your conductor wire, you are ready to prepare the wire ends for testing with a battery.

3. Prepare Wire Ends to make contact with Battery Terminals.
We cover how to prepare both Magnet Wire and Connect Wire.
Generally, at each end of your wire, REMOVE between 1.0 and 1.5 inches of the wires insulative material. This will make an electrical connection with a battery possible.
Two common types of insulative materials:
Varnish. Magnet wire uses varnish as an insulator.
Sleeve. Connect wire will typically have what we call a sleeve, or a jacket. You could say, “I removed the jacket”.
We could also say, we’re going to “strip the wire”, which means removing the insulation from the ends, so the conductive part is exposed. “Stripping the wire” is also a commonly used term.
Remember, we need to prepare the wire ends to allow the battery’s energy, i.e., its “electric charge” / “electricity”, to move through the conductor wire, which in turn, creates a magnetic field, which we call, magnetism.
Preparing: Magnet Wire.
See video below.
Magnet wire has a reddish colored outer varnish that will need to be removed. This is its insulative/protective coating.
REMOVE between 1.0 inch to 1.5 inches of varnish from each wire end, using one of the two methods described below:
1. Using sandpaper. 120 grit sandpaper works well, however, many grit sizes will work in removing the red varnish from the magnet wire. Use a scraping motion, from one side to the other; do not slide the sandpaper back and forth, at the end of the wire.
2. Using a razor blade. Remember, “pull” the blade across the wire, don’t “push” it into wire; as described below.
If right handed, hold the wire with your left hand, and have the wire end point to the right.
First, angle the top of the razor blade to the right, “ahead” of the sharp edge that will scrape the wire, so when you move the blade across the wire, from left to right, you are “pulling” the razor blade across the wire, from left to right.
Caution: Do not angle the top of your razor blade “behind” the sharp edge, and then “push” from left to right, as this will likely cut into the wire.
When scraping, allow the razor blade edge to go past the wire end edge.
Preparing: Connect Wire.
See video below.
Connect wire has a nylon insulative material (sleeve/jacket) that will need to be removed from the ends to expose the conducting copper wire underneath. This bare exposed wire will be making contact with the battery terminals.
Many tools exist for stripping wire ends. Such as a basic wire stripper tool. Or, another option: a low cost tool is the razor blade. Only use a razor blade if you are comfortable working with it.
REMOVE between 1.0 inch to 1.5 inches of the jacket from each wire end, using one of the two methods described below:
1. Using wire strippers.
Some wire strippers may have many different hole sizes, for stripping different sized wires. In case you missed it, you can see some wire stripper examples above, in section 2. Parts, and 2. wire (conductors).
Be sure to match up your wire size and the tool’s stripping feature. For example, if using wire size 18, be sure to put wire in tool at the wire size 18 cutting area.
Open tool handle, place wire into correct stripping area (matching wire size and cutting area), then using firm pressure, close handles as you rotate the tool around both back and forth, a few times. Pull off the piece of cut-off jacket easily.
2. Using a razor blade.
When using a razor blade, the goal is to cut and remove a small piece of insulation from the wire end. This is completed by cutting completely around the wire sleeve, basically, in a circle.
Firmly push the sharp blade of the razor into the insulative, protective coating and rotate the blade in a forward direction, at least half-circle, do not let the blade up yet…reverse direction, and cut into the other side, ending both cuts at the same spot. Make sure to have a cut line around the circle.
Keep the cut straight, so it lines up with the other cut side. This is the cut circle, and should be perpendicular to wire.
Remove the piece of cut sleeve by pulling on it. This will expose the metal wire underneath.
Expose the copper (or aluminum) wire, this is the part of the wire that needs to make physical contact with the battery terminals, as described below. Prepare both ends of the wire.
Preparing: Pigtails.
See video below.
To help make a better connection with the battery, we suggest putting a “pigtail” on your wire ends.
4. test
Time to "power up" your electromagnet and test it!
You will need to make a connection between the wire ends and the battery terminals. First, a few words of caution.
Remember safety when using a new battery to power your electromagnet. As you use your fingertips to hold the wire ends to the battery terminals, your fingertips may feel a hot sensation, as electric charge flows from the battery through the wire, back to the battery.
You may want to put a piece of tape on your fingertips to insulate against the heat generated by a new battery.
Be prepared to disconnect the battery and wires to turn off your electromagnet.
This will create an OPEN CIRCUIT and WILL NOT allow electric charge to flow in the wire. See picture below for an Open Circuit.

In contrast, a CLOSED CIRCUIT WILL allow for electric charge to flow in the wire. See picture below for a Closed Circuit.
Begin testing now by making a Closed Circuit.
To make a closed circuit, use your fingertips to hold one wire end to the positive (+) terminal of the battery and the other wire end to the negative (-) side of the battery.
You have now “Completed the Circuit”, proceed immediately to test and check for your invisible force, magnetism.
Touch one end of the Iron Core to a paper clip or other small metal test part.
You should be able to attract the paper clip and lift it into the air.
Congratulations! You have created an invisible force…magnetism.
Try to lift as much as you can with your electromagnet.
You may experiment and check for performance differences by testing with various items: Wire Sizes/Lengths, Iron Cores & Batteries.

GREAT...YOU'RE ALOMST DONE
2 More steps to complete the electromagnet build challenge:
POST IT: send us an email with your build pic and a short bio. click the pOST IT button below to continue.
SHARE IT: After your build pic is verified, you will receive an email with an invite to share it on Discord.
Builder Testimonials
Be one of the first to have your testimonial posted here! Please email us a testimonial today.


Email us for questions
